
If a backflow preventer on your fire protection system is leaking, do not shut down critical control valves on your own. Notify your certified backflow tester and your life-safety owner immediately, document the leak type and location, and confirm temporary serviceability with the local water authority before scheduling repair. NFPA 25 and Uniform Plumbing Code (UPC) Section 603.5.14 both require documented testing and reporting on this exact scenario, so your paper trail matters as much as the fix.
TL;DR:
- Leaking backflow preventers can compromise water quality and fire suppression due to pressure loss and head drop affecting system flow.
- The most common causes include worn check seats, relief valve faults, debris buildup, corrosion, and improper previous repairs.
- Immediate response requires documenting the leak, confirming its nature, notifying stakeholders, and obtaining local authority approval before repair.
- Certified testers measure differential pressure and flow to identify internal leaks, with regular testing mandated by NFPA 25 and the UPC.
- Repair costs vary from simple rebuilds to full replacement, and prompt, documented action is crucial to avoid fines and system shutdowns.
Table of Contents
- What a leaking backflow preventer means for your water supply and system performance
- Common mechanical causes of leaks in fire-protection backflow assemblies
- Immediate actions when your backflow preventer is leaking
- What certified testers measure and how they trace the leak
- Repair, rebuild, or replace: making the right call
- Building a maintenance schedule that actually prevents leaks
- Documentation and reporting checklist after a failed test
- The health risks hiding behind a “small” backflow leak
- Tools and equipment for finding and fixing a leak
- What it actually costs to fix a leaking backflow preventer
- A technician’s view on closing out a leaking assembly fast
- How Preactionfire handles backflow inspection, repair, and retest
- Sources
What a leaking backflow preventer means for your water supply and system performance
A leak on a fire protection backflow assembly is a warning of two separate risks: potable water contamination and fire suppression reliability. These assemblies exist because pressure loss (backpressure) or a drop in supply pressure (backsiphonage) can pull fire-system water, treated with corrosion inhibitors or antifreeze, back into the drinking water main. UPC Section 603.5.14 requires testable assemblies on any potable-supplied system under normal pressure, and it bumps the requirement to reduced pressure (RP) protection whenever additives or Fire Department Connections (FDCs) raise the hazard class.
There’s a mechanical wrinkle here too. Every backflow assembly creates head loss, meaning it eats into the pressure and flow your sprinkler design counted on. Designers have to build that loss into the hydraulic calculations under NFPA 13, so a device that’s leaking or clogged can silently push your available flow below what a fire actually needs. A steady drip from a relief valve on an RP assembly is normal function, not failure. Water pooling around check valve bodies or flanges is not.
Common mechanical causes of leaks in fire-protection backflow assemblies
Most leaks trace back to a handful of repeat offenders. Worn check seats and discs lose their seal over years of cycling open and closed, letting water pass where it shouldn’t. Debris and mineral scale, especially in older municipal supplies, keep check valves from closing fully. Corrosion eats away at valve bodies and springs in assemblies that sit in damp mechanical rooms, and a prior repair done with the wrong parts can fail again within months.
- Worn check seats or discs: intermittent leak at low flow, gets worse under pressure surges
- Relief valve faults on RP assemblies: continuous discharge instead of occasional relief
- Debris or scale buildup: leak appears after a water main break or hydrant flush nearby
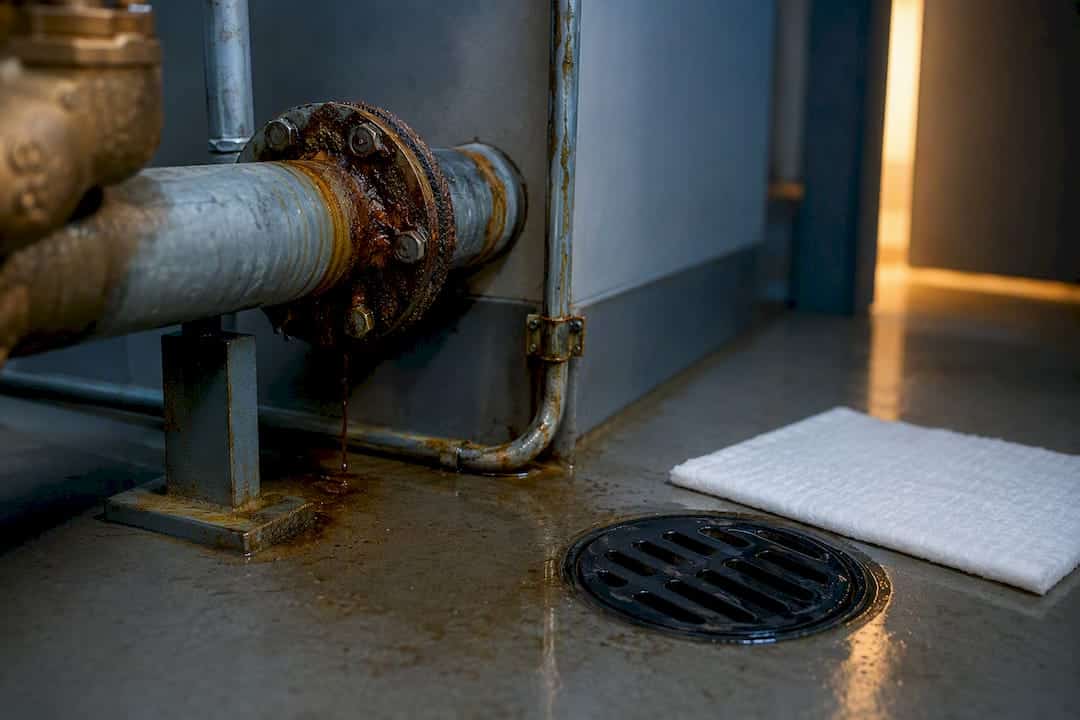
- Corrosion or pitting: visible rust streaks, flaking, or pinhole leaks on the body
- Incomplete prior repair: leak recurs at the same location within weeks
External piping failures, a cracked union or a failed gasket upstream of the assembly, can look exactly like an internal check leak from a distance. Don’t assume the assembly itself is bad until someone actually isolates it.
Pro Tip: Photograph the leak location, drip pattern, and any nearby corrosion before you call your tester. That single detail often cuts a diagnostic visit down by half.
Immediate actions when your backflow preventer is leaking
React in this order, and don’t skip the documentation step even when the leak looks minor.
- Confirm whether the leak is relief-port discharge on an RP assembly or an external piping failure. Don’t close critical control valves before you know which one you’re dealing with.
- Notify the life-safety system owner, your certified backflow tester, and any internal risk or facilities stakeholders.
- Record readings, photos, and the exact leak location before anyone touches the assembly.
- Check with your local water utility about permitted temporary controls. Tag-out on a control valve should only happen with written authorization from someone qualified to make that call.
- Schedule repair with a qualified technician and lock in a retest date.
Before the technician arrives, gather:
- The last passing test report and gauge readings
- Any maintenance history on that specific assembly
- Make, model, and install date if available
Skipping notification is the single most common mistake facility teams make here. A failed test or leak is a compliance event, and treating it as a quiet maintenance fix invites bigger problems if an inspector or the water authority finds out later.
What certified testers measure and how they trace the leak
A certified tester runs a short sequence of checks that reads like a diagnostic fingerprint. Differential pressure readings across each check valve, and across the relief zone on RP assemblies, tell the tester whether a check is holding its seal or letting water slip past under load. A relief port that discharges continuously rather than only occasionally signals a fouled or worn relief valve, which is why the weekly visual check on RP assemblies matters so much between annual tests.
The forward-flow exercise is the test most often skipped, and it’s arguably the most important one. NFPA 25 requires flow testing at system demand annually, confirming the check valves actually open wide enough under real flow, not just hold pressure when static. When plumbing doesn’t allow testing at minimum demand, the standard allows flowing at the maximum achievable rate through drains or hydrants instead of skipping it entirely.
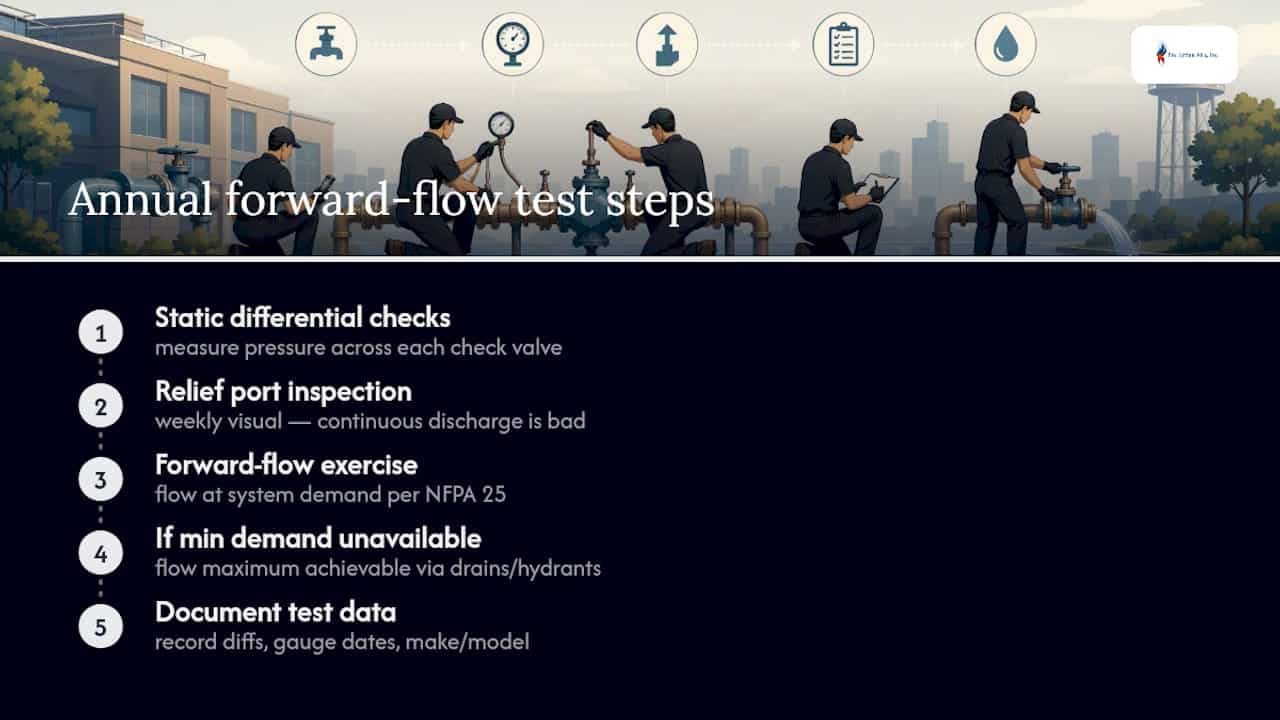
Ask your tester for the actual numbers: measured differential pressures, gauge calibration dates, and the assembly’s make and model. A report that just says “pass” or “fail” without those figures leaves you with nothing to compare against next year.
Repair, rebuild, or replace: making the right call
Not every leak needs a new assembly. Rebuild kits with OEM parts work fine when wear is limited to the rubber seats and springs, and the valve body itself shows no pitting or cracking. Replacement makes more sense once you’re looking at extensive corrosion, an assembly that’s failed the same way more than once, or a model the manufacturer no longer supports with parts.
- Rebuild when: wear is isolated, body condition is sound, OEM kits are available
- Replace when: corrosion is widespread, failures repeat, or the model is discontinued
- Re-evaluate hydraulics when: the replacement assembly has different head loss specs than the original
Any time you swap in a different device, confirm the new head loss figure still leaves your system above the demand NFPA 13 requires. A device with a slightly higher pressure drop than the one it replaced can quietly undercut your design margin, and that’s not something you want to discover during a fire.
Building a maintenance schedule that actually prevents leaks
Most leaks that turn into compliance headaches were preventable months earlier. A working cadence looks like this:
- Weekly: visual check of RP assemblies for continuous relief discharge
- Monthly or quarterly: supervisory checks on associated control valves
- Annually: certified testing including the forward-flow exercise required under NFPA 25
- Periodic internal inspection of the assembly’s internal components
Facilities with a backflow preventer installed ahead of the system main drain also need quarterly main drain tests instead of the standard annual interval, a detail that gets missed more often than it should. Assign a named owner, not just “facilities,” to each item on that list, and log every check into your ITM records the same week it happens.
Pro Tip: Set the annual forward-flow test on the same calendar reminder as your fire pump test. Testers who are already onsite for one will usually knock out the other, saving you a separate service call.
Documentation and reporting checklist after a failed test
A failed test creates a paper trail with a clear beginning and end, and missing a piece of it is what turns a routine repair into an audit problem. Keep these on file:
- The original failed test report with measured differential pressures and relief-port notes
- A repair work order listing exact parts installed and the technician’s credentials
- The passing retest report signed by a certified backflow tester
- Written confirmation the report was submitted to the local water authority
| Document | Who provides it | Why it matters |
|---|---|---|
| Failed test report | Certified tester | Establishes the deficiency and its measured values |
| Repair work order | Repair technician | Proves qualified work with correct parts |
| Passing retest report | Certified tester | Confirms the assembly is back in compliance |
| Submission confirmation | Facility manager | Closes the loop with the water authority |
Submission windows and late-filing penalties vary by water authority, so check with your local jurisdiction rather than assuming a standard timeline applies everywhere. Archive photos and calibration certificates alongside the paperwork. If an inspector questions a repair two years from now, that file is what saves you the argument.
The health risks hiding behind a “small” backflow leak
Most facility teams think about backflow leaks purely as a water contamination issue, and that’s real, but it’s not the whole picture. A leaking assembly that’s also allowing intermittent backflow can pull water treated with corrosion inhibitors, glycol-based antifreeze, or biocide additives into the same piping that eventually reaches drinking fountains and handwashing sinks in the building. That’s the scenario UPC 603.5.14 is written to prevent, and it’s why systems with any additive automatically require RP-level protection.
There’s a second, less obvious hazard. Standing water around a leaking assembly in a mechanical room creates conditions for mold growth and, in warm stagnant conditions, can support bacterial growth including Legionella in nearby plumbing that isn’t flushing regularly. Facility engineers in humid climates or buildings with intermittent occupancy should treat a chronic drip as a moisture management problem, not just a hydraulic one.
There’s also a corrosion feedback loop worth flagging. A slow leak that goes unnoticed for months accelerates corrosion on nearby steel piping, electrical conduit, and structural elements in the mechanical room. That corrosion can, in turn, degrade seals on the very assembly you’re trying to fix, creating a cycle where the leak makes itself worse. None of this requires a dramatic failure. A drip that’s been quietly running for six months does more cumulative damage than most people expect from something that looks minor on any given day.
Tools and equipment for finding and fixing a leak
Diagnosing a backflow leak accurately takes more than a flashlight and a guess. A differential pressure test kit is the core tool certified testers use to measure the pressure drop across each check valve and the relief zone, and it’s what generates the numbers that actually tell you what’s failing. Calibrated gauges matter here. A gauge that’s drifted out of calibration can report a passing differential when the valve is actually leaking, so ask when your tester’s equipment was last calibrated.
For visual and physical diagnosis, technicians typically carry:
- A gauge kit calibrated to the assembly manufacturer’s tolerance
- Seat and disc rebuild kits matched to the specific make and model
- Torque wrenches for reassembling flanged connections to spec
- A moisture meter or thermal camera for tracing hidden leaks behind walls or under insulation
- Dye or tracer tablets in cases where the leak source isn’t visually obvious
For facility managers doing the first-line triage before a technician arrives, a simple approach works: dry the suspected leak point completely, wrap it in paper towel, and check back in an hour. That tells you whether you’re dealing with a steady drip, an intermittent leak tied to system cycling, or condensation that isn’t a leak at all. Skipping that step is how a lot of service calls end up diagnosing condensation instead of a real fault.
What it actually costs to fix a leaking backflow preventer
Repair costs on fire-protection backflow assemblies split roughly into three tiers, and where you land depends on what’s actually failed. A rebuild kit replacing worn seats, discs, and springs is the cheapest fix, since the labor is straightforward and parts are inexpensive relative to a full assembly. A relief valve replacement on an RP assembly runs a bit higher because of the precision fitting required to get the relief zone differential right.
Full assembly replacement is the most expensive path, and it climbs further if the hydraulic re-evaluation flags a need for a larger device to keep head loss within your system’s design margin. Labor costs also shift based on assembly size and accessibility. A rooftop or below-grade vault installation costs more to service than one sitting in an accessible mechanical room, simply because of the extra time getting equipment to the assembly.
The cost that catches facility managers off guard isn’t the repair itself. It’s the compliance cost of delay: a documented failed test that sits unresolved risks fines from the water authority, and in some jurisdictions, can trigger a mandatory system shutdown until the assembly passes retest. Budgeting for prompt repair, rather than deferring it to the next capital cycle, is almost always the cheaper path once you factor in what a shutdown or fine actually costs a commercial building.
A technician’s view on closing out a leaking assembly fast
Every leaking backflow assembly we’ve walked up to starts with the same question: what did the last test report actually say? Precise failure notes, exact differential values and the failure mode, let a technician stage the right parts before the first visit instead of diagnosing on-site and coming back a second time. Our workflow runs verify tester data, targeted rebuild or replace, retest, then submit records to the water authority. NICET certification and ongoing NFPA training keep that sequence consistent no matter which assembly or building we’re working on.
— Results
How Preactionfire handles backflow inspection, repair, and retest
A specialized fire protection company can provide a direct route to getting a leaking backflow assembly diagnosed and closed out correctly, without the guesswork of piecing together tester reports, parts sourcing, and water authority paperwork on your own. Our NICET-certified technicians work from the same NFPA 13 and NFPA 25 framework covered above: they verify the failure data, rebuild or replace based on actual condition rather than assumption, retest, and handle submission to your local water authority.
If your fire protection system’s backflow assembly is leaking right now, that’s not a wait-and-see situation. Preactionfire’s backflow inspection and testing services cover the full cycle: diagnostic testing, certified repair, forward-flow retest, and the documentation your building needs on file. Facility teams in the Denver Metro Area can request a service visit and get a technician onsite with the right parts staged before they ever open the assembly. Reach out to schedule an inspection and get your compliance paperwork current before your next reporting window closes.